
Aha! You painted successfully.
Glad the new fuel pump has met expectations.
Are fork gaiters split or whole (thusly installed over disconnected fork slider)?
You remain the "R1150 Brake Master" (sic) in my estimation.
Need to start my own topic for Rockster2 happenings.
Thanks for update James.
I'm Baaaaaaa-aack!
Moderator: Moderators
Re: I'm Baaaaaaa-aack!
Rockster#2, K1300S, S1000R (for sale)
-
riceburner

- Basic User
- Posts: 3809
- Joined: Fri Mar 18, 2005 7:54 am
- Location: Hiding in your blind spot....
- Contact:
Re: I'm Baaaaaaa-aack!
You're far too kind! The paint job finish is terrible!sweatmark wrote:Aha! You painted successfully.
Glad the new fuel pump has met expectations.
Are fork gaiters split or whole (thusly installed over disconnected fork slider)?
You remain the "R1150 Brake Master" (sic) in my estimation.
Need to start my own topic for Rockster2 happenings.
Thanks for update James.
The gaiters are complete tubes, hence why the stanchions came off.
Still not convinced by the fuel pump, but will use it for now.
-
riceburner
- Basic User
- Posts: 3809
- Joined: Fri Mar 18, 2005 7:54 am
- Location: Hiding in your blind spot....
- Contact:
FINALLY!
I have BRAKES! Brakes worthy of the name, not poor meagre attempts at braking - but no - brakes that are actually capable of overcoming the grip of tyres on tarmac!!

First step:
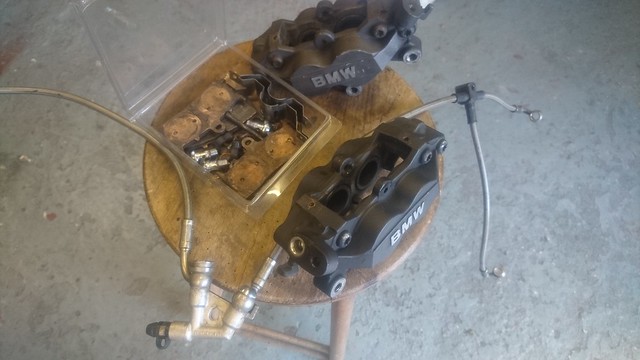
Remove old crappy calipers

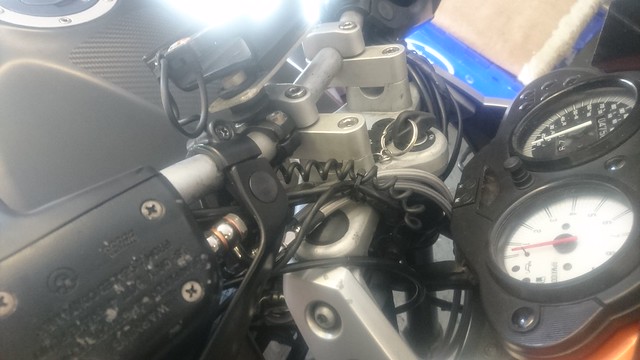
Clear away the handlebar gubbins

Very important: keeping the master cylinder pulled tight means that the reservoir won't piss itself all over the bike when you remove the hoses.....

Yes - ALL the gubbins....

You don't know how long I've waited for this moment.....

Give the sealing surface a wipe off

Drain off the old calipers and hoses

New (2nd hand) Brembo goodness

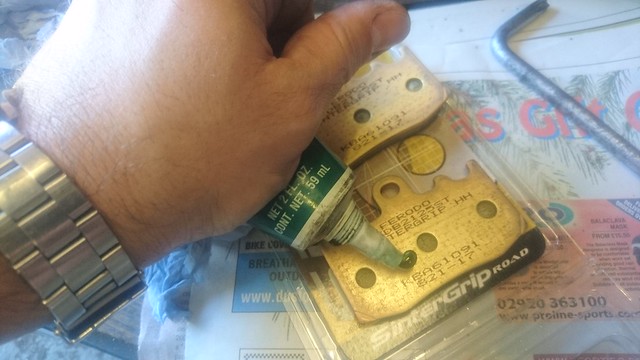
Hi-temp grease for the pads.
And in they go....
(yes I did up the pin properly....)

THE SHINY!! OOOH THEY SHINEYY!!!
I wants it, I HAS IT!
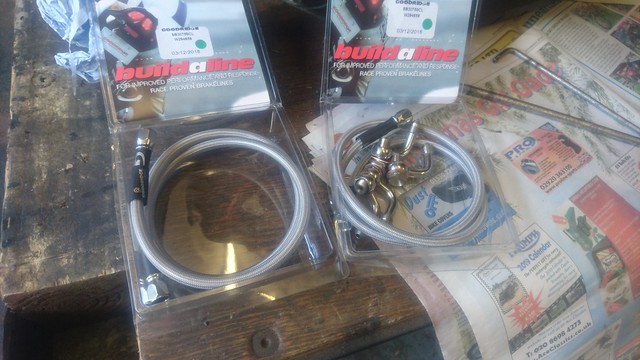
This is the glory of the Goodridge 'build a line' system.
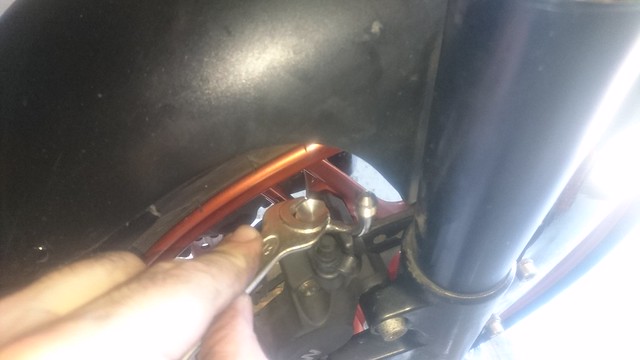
Mount up the banjos FIRST
 r
r
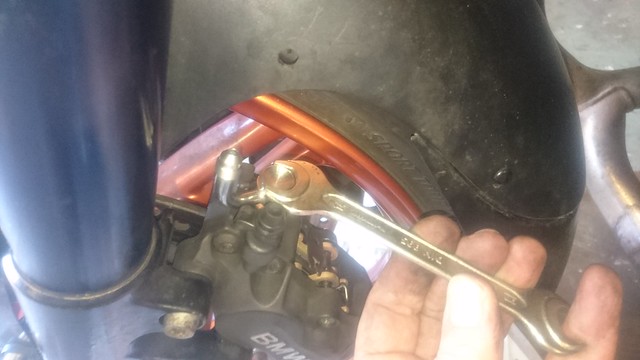
That 14mm spanner is a little awkward on this side (thanks to the nipple placement)
The double banjo at the top
(the cable tie is to keep them together (but not RIGHT together) as I do up the bolt - otherwise the outer banjo will rotate into an awkward position
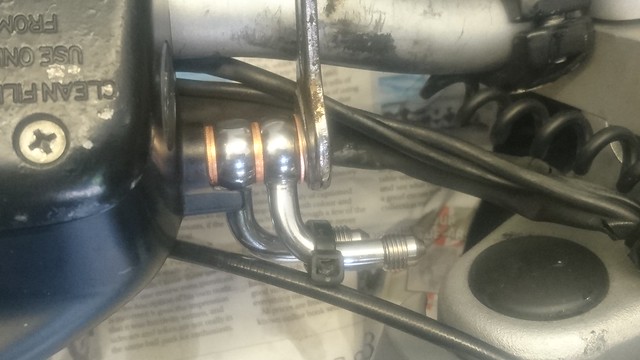
THEN start hooking up the hoses
(but don't do them up tight JUST yet)

Because you want to get them laid out into their routing FIRST
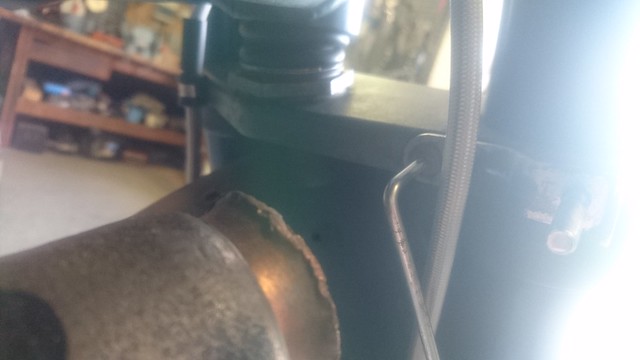
The P-clips help to tidy things up.

Removing the old T-split support bracket - yet another mullered bolt.....
Doesn't 'look' that bad.....

Found a couple of matching screws for the P-clips - don't forget the copa-slip!

Once all the hoses are together, and tightened (ahem...*)
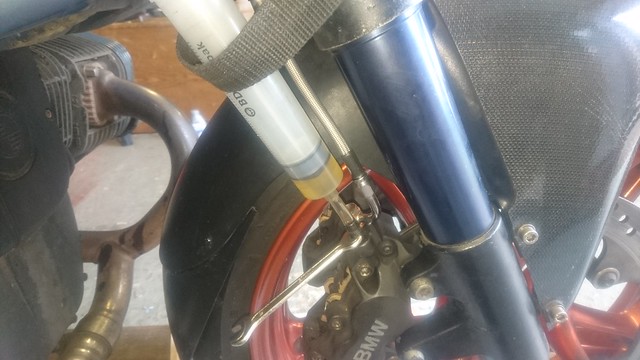
Got the hoses bled up.... then out onto tarmac for bedding in the new pads
 r
r

Everything that came off:
Tidied up and stored away, probably to rot forever, but anyone actually wants any of the bits let me know. (the hoses are factory fit lengths of braided and will go on a standard R1150R with ease).
 r
r
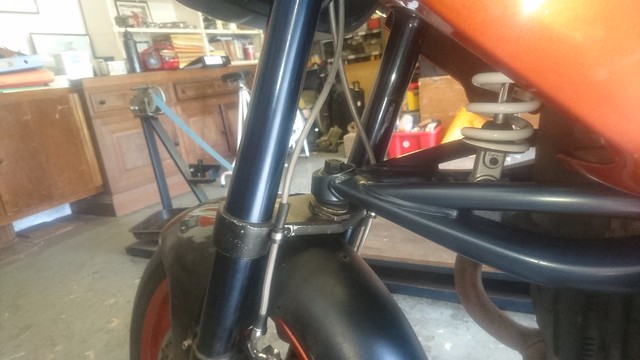
Checking the hoses don't foul anything

Nice and neat up top.
Realised the hoses were engaging with the swingingarm at full lock, so turned the P-Clips around and the result is much neater.
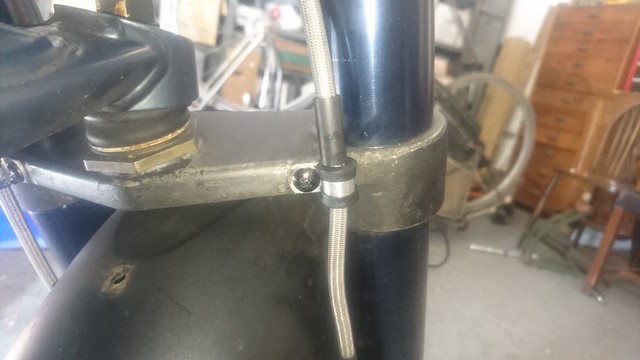
Clearance at full lock.

Nice and tidy
I feel I need to explain this...

If I used 3 'thin' copper washers, the Goodridge double banjo bolt grounds out in the m/c BEFORE it goes tight (it's ever so slightly too long).
SO - LUCKILY the Goodridge order came with 10 THICK copper washers. At first I was uncertain about using them - the double banjo is actually measured out for fitting 2 banjos with THIN washers, and if you use 3 THICK washers the galleries for the second banjo are out of alignment. HOWEVER - use them like this, and the galleries line up (more or less) ok. Certainly good enough for government work.
Heading out tomorrow for shakedown ride and then a day on the bike (I hope).
* Yes I forgot to tighten up one of the damn fittings and it leaked fluid all over the caliper. No photos because the phone battery was nearly dead and I figured taking photos was distracting me a bit
I have BRAKES! Brakes worthy of the name, not poor meagre attempts at braking - but no - brakes that are actually capable of overcoming the grip of tyres on tarmac!!
First step:
Remove old crappy calipers
Clear away the handlebar gubbins
Very important: keeping the master cylinder pulled tight means that the reservoir won't piss itself all over the bike when you remove the hoses.....
Yes - ALL the gubbins....
You don't know how long I've waited for this moment.....
Give the sealing surface a wipe off
Drain off the old calipers and hoses
New (2nd hand) Brembo goodness
Hi-temp grease for the pads.
And in they go....
(yes I did up the pin properly....)
THE SHINY!! OOOH THEY SHINEYY!!!
I wants it, I HAS IT!
This is the glory of the Goodridge 'build a line' system.
Mount up the banjos FIRST
rThat 14mm spanner is a little awkward on this side (thanks to the nipple placement)
The double banjo at the top
(the cable tie is to keep them together (but not RIGHT together) as I do up the bolt - otherwise the outer banjo will rotate into an awkward position
THEN start hooking up the hoses
(but don't do them up tight JUST yet)
Because you want to get them laid out into their routing FIRST
The P-clips help to tidy things up.
Removing the old T-split support bracket - yet another mullered bolt.....
Doesn't 'look' that bad.....
Found a couple of matching screws for the P-clips - don't forget the copa-slip!
Once all the hoses are together, and tightened (ahem...*)
Got the hoses bled up.... then out onto tarmac for bedding in the new pads
rEverything that came off:
Tidied up and stored away, probably to rot forever, but anyone actually wants any of the bits let me know. (the hoses are factory fit lengths of braided and will go on a standard R1150R with ease).
rChecking the hoses don't foul anything
Nice and neat up top.
Realised the hoses were engaging with the swingingarm at full lock, so turned the P-Clips around and the result is much neater.
Clearance at full lock.
Nice and tidy
I feel I need to explain this...
If I used 3 'thin' copper washers, the Goodridge double banjo bolt grounds out in the m/c BEFORE it goes tight (it's ever so slightly too long).
SO - LUCKILY the Goodridge order came with 10 THICK copper washers. At first I was uncertain about using them - the double banjo is actually measured out for fitting 2 banjos with THIN washers, and if you use 3 THICK washers the galleries for the second banjo are out of alignment. HOWEVER - use them like this, and the galleries line up (more or less) ok. Certainly good enough for government work.
Heading out tomorrow for shakedown ride and then a day on the bike (I hope).
* Yes I forgot to tighten up one of the damn fittings and it leaked fluid all over the caliper. No photos because the phone battery was nearly dead and I figured taking photos was distracting me a bit
Re: I'm Baaaaaaa-aack!
Thanks for the good write up with pics. 
I replaced mine a few years ago with the SS lines (old ones were rubber on the R) but used the the set up with a T with a crossover right behind the fender. I figured that there would be less chance of messing up than the two line install.
I replaced mine a few years ago with the SS lines (old ones were rubber on the R) but used the the set up with a T with a crossover right behind the fender. I figured that there would be less chance of messing up than the two line install.
Buckster '03R
#543
#543
-
riceburner
- Basic User
- Posts: 3809
- Joined: Fri Mar 18, 2005 7:54 am
- Location: Hiding in your blind spot....
- Contact:
Re: I'm Baaaaaaa-aack!
My thoughts are that the T-piece and the 'U'-piece are places where air bulbs can easily be trapped - hence why I far prefer the 2-parallel lines option.Buckster wrote:Thanks for the good write up with pics.
I replaced mine a few years ago with the SS lines (old ones were rubber on the R) but used the the set up with a T with a crossover right behind the fender. I figured that there would be less chance of messing up than the two line install.
IIRC it's commonly used in racing because there's also regs (in some classes) that state that the brake hose MUST NOT pass over the wheel - presumably to prevent any tyre destruction events damaging the brake hoses and spilling fluid onto the track, or causing the brakes to completely fail.
-
Tigcraft
- Basic User
- Posts: 89
- Joined: Sat Mar 02, 2013 5:29 pm
- Location: Somewhere in the wet Pennines
Re: I'm Baaaaaaa-aack!
Looks like someone has had an enjoyable spannering session? I just love it when a plan comes together as I’m doing similar jobs to my Mz Skorpion sport now it’s come out of a 4 1/2 deep sleep! I would post pics but it’s still beyond me!
-
riceburner
- Basic User
- Posts: 3809
- Joined: Fri Mar 18, 2005 7:54 am
- Location: Hiding in your blind spot....
- Contact:
Re: I'm Baaaaaaa-aack!
Always good fun!
Realied today though that I've lost one of the bolts from the rear caliper, doh! Couple of cable ties got me home though.
Realied today though that I've lost one of the bolts from the rear caliper, doh! Couple of cable ties got me home though.
-
riceburner
- Basic User
- Posts: 3809
- Joined: Fri Mar 18, 2005 7:54 am
- Location: Hiding in your blind spot....
- Contact:
Re: I'm Baaaaaaa-aack!
There's always something..... FD bearing has gone.
-
riceburner
- Basic User
- Posts: 3809
- Joined: Fri Mar 18, 2005 7:54 am
- Location: Hiding in your blind spot....
- Contact:
Re: I'm Baaaaaaa-aack!
So... fd bearings are being replaced, but I've been shown a knackered outside pivot pin, and the aftermarket rear disc is rubbing on the inside of the caliper!
Cheap bikes are anything but!
Cheap bikes are anything but!
-
riceburner
- Basic User
- Posts: 3809
- Joined: Fri Mar 18, 2005 7:54 am
- Location: Hiding in your blind spot....
- Contact:
Re: I'm Baaaaaaa-aack!
Quick update - the FD bearings are all sorted, many thanks to MotoScot near Luton - highly recommended!
Gave the bikes a clean - they come up well

(shoddy photo due to poor lens on phone-camera).
Discovered the K has a sodding puncture.... that's the next job!
I also took the time last weekend to replace the latching mechanism on one of the panniers (AND the orange tab on the lock); AND managed to key-match the locking plate for my old K12RS tail-bag. I also moved my 'tool-tube' so that it fits nice and neatly under the LHS pannier cutout (I'm running the bike without an end can).
Fairly easy process tbh - the hardest part was drilling out the rivets that hold the pannier latch mechanism into the pannier body.
Also worth noting for anyone else attempting this (or anyone who finds this thread at a later date... ) - do NOT include the last of the 'active' blades in the pannier lock barrel (the very last blade is the one that locks the barrel to the cylinder). Once the barrel is in the cylinder, the second to last blade (ie, the last one the key interacts with) locks the key into the barrel. I think I knew this at some point in the past but had forgotten it.
So I now have full luggage with matching keys all round*.
* Well - apart from the knackered old Givi topbox who's lock seized up completely a while back, not that I ever had a key for it anyway.
Gave the bikes a clean - they come up well
(shoddy photo due to poor lens on phone-camera).
Discovered the K has a sodding puncture.... that's the next job!
I also took the time last weekend to replace the latching mechanism on one of the panniers (AND the orange tab on the lock); AND managed to key-match the locking plate for my old K12RS tail-bag. I also moved my 'tool-tube' so that it fits nice and neatly under the LHS pannier cutout (I'm running the bike without an end can).
Fairly easy process tbh - the hardest part was drilling out the rivets that hold the pannier latch mechanism into the pannier body.
Also worth noting for anyone else attempting this (or anyone who finds this thread at a later date... ) - do NOT include the last of the 'active' blades in the pannier lock barrel (the very last blade is the one that locks the barrel to the cylinder). Once the barrel is in the cylinder, the second to last blade (ie, the last one the key interacts with) locks the key into the barrel. I think I knew this at some point in the past but had forgotten it.
So I now have full luggage with matching keys all round*.
* Well - apart from the knackered old Givi topbox who's lock seized up completely a while back, not that I ever had a key for it anyway.
-
Tigcraft
- Basic User
- Posts: 89
- Joined: Sat Mar 02, 2013 5:29 pm
- Location: Somewhere in the wet Pennines
Re: I'm Baaaaaaa-aack!
Any pics of the ‘tool tube’ in its new position James?
-
riceburner
- Basic User
- Posts: 3809
- Joined: Fri Mar 18, 2005 7:54 am
- Location: Hiding in your blind spot....
- Contact:
Re: I'm Baaaaaaa-aack!
Will try to take some soon.Tigcraft wrote:Any pics of the ‘tool tube’ in its new position James?
-
riceburner
- Basic User
- Posts: 3809
- Joined: Fri Mar 18, 2005 7:54 am
- Location: Hiding in your blind spot....
- Contact:
Re: I'm Baaaaaaa-aack!
Tooltube:


I should probably note that the brackets used are actually OE BMW....
I should probably note that the brackets used are actually OE BMW....
Last edited by riceburner on Tue Sep 03, 2019 5:22 pm, edited 1 time in total.
-
riceburner
- Basic User
- Posts: 3809
- Joined: Fri Mar 18, 2005 7:54 am
- Location: Hiding in your blind spot....
- Contact:
Re: I'm Baaaaaaa-aack!
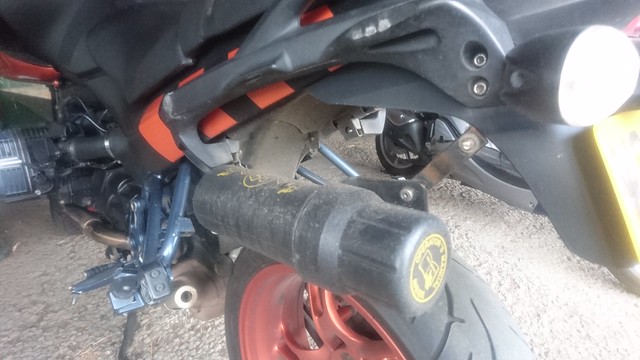
Oh, and this afternoon, prior to bombing the A3 and catching the ferry i upgraded my exhaust stub.
 DSC_0766 by James Bridge-Butler, on Flickr
Nice little slash cut cut off a catalyser box I bought for 25 quid.
DSC_0766 by James Bridge-Butler, on FlickrNice little slash cut cut off a catalyser box I bought for 25 quid.
Re: I'm Baaaaaaa-aack!
just read the thread. same copper as mine. hey, do you really recommend the brembo upgrade? i put HH in mine and find them prettyddamn good. but you are right there is some drag.
i need to do the line upgrade since i have risers. some binding... esp. clutch.
also, is yours abs? looks like there's a 'u' piece in the line where there would be a 3 way t piece. mine was ABS but i machined a new adapter to bridge two halves. Abs deleted.
i need to do the line upgrade since i have risers. some binding... esp. clutch.
also, is yours abs? looks like there's a 'u' piece in the line where there would be a 3 way t piece. mine was ABS but i machined a new adapter to bridge two halves. Abs deleted.
Re: I'm Baaaaaaa-aack!
James is our resident Rockster brakes expert, given the UK's corrosive winter conditions and his hands-on experience. Bought myself a Brembo/BMW Evo caliper pair based on his recommendation, due for install on my Rockster #2.
Rockster#2, K1300S, S1000R (for sale)
-
riceburner
- Basic User
- Posts: 3809
- Joined: Fri Mar 18, 2005 7:54 am
- Location: Hiding in your blind spot....
- Contact:
Re: I'm Baaaaaaa-aack!
Mine is not ABS, I don't like it, and I've never bought an R259 with it.
But even the non-ABS bikes have that u-shaped union.
I would recommend the Brembo calipers, it's a simple bolt on swap.
The 2-line, double banjo bolt braided hoses upgrade i also Highly Recommend.
Be aware that the Brembos will betray worn discs by feeling like there is slightly too much "free play", (but you'll still get incredible braking*).
* I locked up the front twice last week in France. Dry weather, warm conditions, good tarmac, tyres had less than 2000 miles on them (Pirelli Angel ST), and a good handful will still overwhelm the grip: excellent brakes.
-
riceburner
- Basic User
- Posts: 3809
- Joined: Fri Mar 18, 2005 7:54 am
- Location: Hiding in your blind spot....
- Contact:
Re: I'm Baaaaaaa-aack!
sweatmark wrote:James is our resident Rockster brakes expert, given the UK's corrosive winter conditions and his hands-on experience. Bought myself a Brembo/BMW Evo caliper pair based on his recommendation, due for install on my Rockster #2.
"Ex" is something that has been, and "spurt" is a drip under pressure.
Yeah, that fits!
Re: I'm Baaaaaaa-aack!
cant have enough brakes! but i have to say the stock ones with the HH pads are decent enough i have new dics also whuch are nice and smooth... 2 finger at most and 1 most of the time.riceburner wrote:Mine is not ABS, I don't like it, and I've never bought an R259 with it.
But even the non-ABS bikes have that u-shaped union.
I would recommend the Brembo calipers, it's a simple bolt on swap.
The 2-line, double banjo bolt braided hoses upgrade i also Highly Recommend.
Be aware that the Brembos will betray worn discs by feeling like there is slightly too much "free play", (but you'll still get incredible braking*).
* I locked up the front twice last week in France. Dry weather, warm conditions, good tarmac, tyres had less than 2000 miles on them (Pirelli Angel ST), and a good handful will still overwhelm the grip: excellent brakes.
Maybe I'll go with the brembos down the track are they interchangeable with the k bikes? There seems to be a few of them on eBay.
-
riceburner
- Basic User
- Posts: 3809
- Joined: Fri Mar 18, 2005 7:54 am
- Location: Hiding in your blind spot....
- Contact:
Re: I'm Baaaaaaa-aack!
I don't know about the Ks, I'm hoping so because I have a K12R, and if I keep it I'll probably want to do the same swap.